Posts

Running Hello_world application ( based on Zephyr RTOS ) on Arduino Due

Image
Zephyr Project goal is to build a best-in-breed small, scalable, real-time operation system (RTOS) for variety of IoT devices, such as X86 boards (Arduino 101, Galileo, Intel Quark D2000 development board,..), ARM boards (96Boards, Arduino Due, CC3200 LauchXL, Curie, NXP FRDM, ST Nucleo,...) ARC Boards, NIOS II Boards, XTENSA Boards. In this post, we test a Hello_world application ( based on Zephyr RTOS ) on Arduino Due Requirement - Host Computer: Ubuntu 16.04 LTS 64-bit - Device: Arduino Due 1. Setup development environment - Update your OS $ sudo apt-get update $ sudo apt-get upgrade     - Install requirements $ sudo apt-get install git make gcc g++ python3-ply ncurses-dev \ python3-yaml python2.7 dfu-util - Install the Zephyr SDK   * Download the latest SDK self-extractable binary. $ wget https://github.com/zephyrproject-rtos/meta-zephyr-sdk/releases/download/0.9.1/zephyr-sdk-0.9.1-setup.run   * Run the installation binary ...

OpenHab2 - MQTT binding demo

Image
OpenHab2 - MQTT binding demo This demo demonstrates how to use MQTT binding addon in OpenHAB2 installed into Orange Pi zero. The idea is very basic. A switch is created on default sitemap. When you turn on the switch, it sends "ON" message to Topic  /office/light  via MQTT broker that is installed on Orange Pi. When you turn off the switch, it sends "OFF" message to Topic  /office/light . Require Openhab2 MQTT broker installed. First, install MQTT binding via paperui Define all the brokers which you want to connect to, in your  services/mqtt.cfg  file. cd /etc/openhab2/services sudo nano mqtt .cfg Edit the file as follow # # Define your MQTT broker connections here for use in the MQTT Binding or MQTT # Persistence bundles. Replace <broker> with an ID you choose . # # URL to the MQTT broker, e.g. tcp://localhost: 1883 or ssl://localhost: 8883 mosquitto.url=tcp://localhost: 1883 # Optional. Client id ( max 23 chars) to us...

Install Node-RED on Orange Pi

Image
Step 1: Install NodeJs v7.x curl -sL http s: // deb .nodesource. com /setup_7. x | sudo -E bash - sudo apt- get install - y nodejs Step 2: Install Node-RED sudo npm install -g --unsafe-perm node-red Step 3: Start Node-RED root@orangepizero:~# node-red 22 Mar 17 : 51 : 35 - [ info ] Welcome to Node-RED =================== 22 Mar 17 : 51 : 35 - [ info ] Node-RED version: v0.16.2 22 Mar 17 : 51 : 35 - [ info ] Node.js version: v7.7.3 22 Mar 17 : 51 : 35 - [ info ] Linux 3.4 .113-sun8i arm LE 22 Mar 17 : 51 : 37 - [ info ] Loading palette nodes 22 Mar 17 : 51 : 43 - [warn] ------------------------------------------------------ 22 Mar 17 : 51 : 43 - [warn] [rpi-gpio] Info : Ignoring Raspberry Pi specific node 22 Mar 17 : 51 : 43 - [warn] ------------------------------------------------------ 22 Mar 17 : 51 : 43 - [ info ] Settings file : /root/.node-red/settings.js 22 Mar 17 : 51 : 43 - [ info ] User directory : /root/.node-red 22 Mar 17 : 51 : 43 - [...

The OpenIoTChallenge 3.0 was through. Thanks to Eclipse IoT Working Group

We - the AgriNode team are proud to receive the Special  Acknowledgement from the  judging panel.  https://www.eclipse.org/org/press-release/openiotchallenge3_winners.php Thanks to the EclipseIoT and the sponsors for organizing the Open IoT Challenge where we have learned about Open-source IoT platforms and made new friends in the IoT world.

Install Eclipse Kura on Orange Pi Zero (9$; 512MB of RAM)

Image
Orange Pi is a series of cheap single-board computers. It can run   It can run Android 4.4, Ubuntu, Debian, Rasberry Pi Image. In this post, I tried to install Eclipse Kura on a Orange Pi Zero which has    the AllWinner H2 SoC, and has 512MB DDR3 SDRAM. This board will be the next generation for our system (Agrinode project). The fist step, we install Kura on the board and test is to verify that it can work correctly as the Raspberry Pi. This post is also available at AgriNode project page:  https://agrinode.github.io/docs/orangepi/ Install Debian on Orange Pi Please follow the link:  https://docs.armbian.com/User-Guide_Getting-Started/ Install default java JRE/JDK on Debian (JDK 7) Web Browser Plugin To install the default Web Browser Plugin on your system, run: apt-get install icedtea- plugin JRE To install the default JRE (Java Runtime Environment) on your system, run: apt-get install default -jre JDK To insta...

Final report for Open IoT Challenge 3.0

Image
AgriNode project: Building A Wireless Sensor Network for Agricultural Application AgriNode project goal is to build an Internet of Things – IoT solutions for various agricultural applications. We successfully developed the AgriNode system which is a Wireless Sensor Network – WSN consisting a gateway and sensor nodes. In the project, We utilized   Low-cost devices (Arduino, Raspberry) and Open-sources IoT platforms (Eclipse Kura, Reactive Blocks). Webpage: https://agrinode.github.io Report (PDF version): http://bit.ly/2lQc8Er Live data: https://agrinode.mybluemix.net/ui/#/0    ACKNOWLEDGEMENT I would like to acknowledge the support of Mr. Benjamin CabĂ© and Miss Roxanne Joncas from Eclipse Foundation . I also sincerely thank Mr. Tim Jagenberg and Miss Anne Nevin from Bitreactive for the help of building AgriNode project software.

Hardware choices for AgriNode System- Wireless Sensor Network System

Image
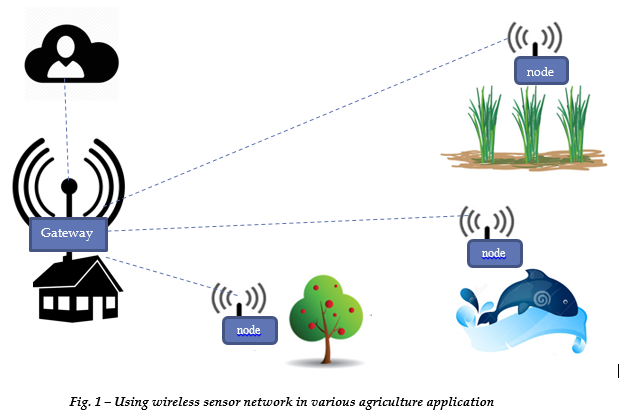
The goal of AgriNode project is to build a Wireless Sensor Network - WSN for agricultural applications such as greenhouse management, monitoring water quality for a fish farm. The system can help farmers to monitor their own farm and support them in decision-making based on sensed data. The Fig. 1 shows the AgriNode system architecture. In this post, we demonstrate the hardware choices for the Agrinode system. To design AgriNode hardware system, we utilized low-cost electric devices that farmer can cover. Agrinode hardware system consists of two main parts: a gateway and sensor nodes.  The gateway (Fig. 2) is a Raspberry Pi 2 with Raspbian Os which is fully compatible with Eclipse Kura - the heat of AgriNode system. A Wifi dongle is added with Raspberry Pi for establishing a WiFi connection which sensor nodes can connect to.  Fig. 2 - AgriNode Gateway Each sensor node contains a microcontroller, power module and connected sensors. The microco...