Posts

Showing posts from 2017

Set up date and time on Debian OS

Image
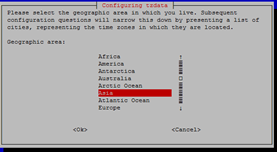
View information on local time, date, timezone,.. timedatectl Local time : Wed 2017 - 08 - 09 14 : 37 : 36 + 07 Universal time : Wed 2017 - 08 - 09 07 : 37 : 36 UTC RTC time : Wed 2017 - 08 - 09 07 : 40 : 07 Time zone: Asia/Ho_Chi_Minh (+ 07 , + 0700 ) NTP enabled: no NTP synchronized: yes RTC in local TZ: no DST active: n/ a Setting date and time timedatectl set-time ‘YYYY-MM-DD HH:MM:SS’ timedatectl set-time YYYY-MM-DD //setting date only timedatectl set-time HH:MM:SS //setting time only Setting timezone sudo dpkg-reconfigure tzdata Then following the step:

Localization of Dates and Times with Flask-Moment

Image
Previous post:  Get started with Python Flask Framework on IBM Bluemix Flask-Moment is an extension for Flask applications that integrates  moment.js into Jinja2 templates. Flask-Moment is installed with pip For locally: $ pip install flask-moment For Bluemix: In  requirements.txt  add: Flask-moment==0.5.1 In  hello.py : Initialize Flask-Moment from flask_moment import Moment moment= Moment (app) Add  moment.js  into base template base.html In  templates/base.html : Import  moment.js  library {% block scripts %} {{ super() }} {{ moment.include_moment() }} {% endblock %} To work with timestamps Flask-Moment makes a moment class available to templates. In hello.py passes a variable called current_time to the template for rendering. In  hello.py : Add a datetime variable. from datetime import datetime @app.route('/') def index () : return render_template( 'index.html' , current_time=datetime.utcnow()) Render current_time in t

Get started with Python Flask Framework on IBM Bluemix

Image
Get started with Python  Flask  Framework on IBM Bluemix This work is based on  Getting started with Python on Bluemix Tutorial The tutorial will develop a Python web application based on Flask framework and deploy the app on  IBM Bluemix . The app shows up a basic form which users can type their names. When hit enter the name will be added to database and can be accessed at  http://base_url/api/visitors 1. Requirement Git Cf Python 2. Clone example code and run locally git clone http s: //github. com /IBM-Bluemix/ get -started- python cd get -started- python Rename your app Open up, manifest.yml similar like: applications : - name : Lecheebot random-route : true memory : 128 M Run your app locally Ensure that you have installed  pip  in your PC. If not, follow this post:  pip and setuptool on windows now, you can run your app locally by typing the command: pip install -r requirements.txt python hello.py Your app is now
Image
Installing Windows 10 IoT Core for Raspberry Pi In this post I will be going to process of how to install Windows 10 IoT core for Raspberry Pi 2. For more information about Windows IoT Core, please visit the official site ( https://developer.microsoft.com/en-us/windows/iot/docs ). Windows IoT core is the operating system built for Internet of Things. Requirement: -           Windows 10 PC -           SD Card -           Raspberry Pi 2 Get started 1. Download OS for Raspberry Pi Firstly, we need to download Windows 10 IoT core package for Raspberry Pi 2 on the official website: https://developer.microsoft.com/en-us/windows/iot/Downloads After downloading the package, we then Install Windows IoT Core For Raspberry Pi on your PC. Double-click on the file downloaded and install Windows 10 IoT Core for Raspberry Pi. After installing, the flash file will be saved in your C drive (C:\Program Files (x86)\Microsoft IoT\FFU\RaspberryPi2\flash.ffu) 2.

My latest publication: Environment monitoring system for agricultural application based on wireless sensor network

Image
This paper proposes an Internet of Thing system architecture based on Wireless Sensor Network (WSN) for agricultural applications. The system consists of sensor nodes and a gateway, which allows a user to monitor environmental data for agriculture using a web browser. The sensor node is a microcontroller based Arduino including wireless module and connected sensors such as temperature, relative humidity, luminosity, air pressure and other sensors. A WiFi interface is deployed to exchange the environmental information from sensor nodes to the gateway running Linux. The gateway manages and transfers data to a Cloud where data were stored and visualized as graphs. For more infomation: https://goo.gl/zhRQze    

Running Hello_world application ( based on Zephyr RTOS ) on Arduino Due

Image
Zephyr Project goal is to build a best-in-breed small, scalable, real-time operation system (RTOS) for variety of IoT devices, such as X86 boards (Arduino 101, Galileo, Intel Quark D2000 development board,..), ARM boards (96Boards, Arduino Due, CC3200 LauchXL, Curie, NXP FRDM, ST Nucleo,...) ARC Boards, NIOS II Boards, XTENSA Boards. In this post, we test a Hello_world application ( based on Zephyr RTOS ) on Arduino Due Requirement - Host Computer: Ubuntu 16.04 LTS 64-bit - Device: Arduino Due 1. Setup development environment - Update your OS $ sudo apt-get update $ sudo apt-get upgrade     - Install requirements $ sudo apt-get install git make gcc g++ python3-ply ncurses-dev \ python3-yaml python2.7 dfu-util - Install the Zephyr SDK   * Download the latest SDK self-extractable binary. $ wget https://github.com/zephyrproject-rtos/meta-zephyr-sdk/releases/download/0.9.1/zephyr-sdk-0.9.1-setup.run   * Run the installation binary   $ chmod +x ze

OpenHab2 - MQTT binding demo

Image
OpenHab2 - MQTT binding demo This demo demonstrates how to use MQTT binding addon in OpenHAB2 installed into Orange Pi zero. The idea is very basic. A switch is created on default sitemap. When you turn on the switch, it sends "ON" message to Topic  /office/light  via MQTT broker that is installed on Orange Pi. When you turn off the switch, it sends "OFF" message to Topic  /office/light . Require Openhab2 MQTT broker installed. First, install MQTT binding via paperui Define all the brokers which you want to connect to, in your  services/mqtt.cfg  file. cd /etc/openhab2/services sudo nano mqtt .cfg Edit the file as follow # # Define your MQTT broker connections here for use in the MQTT Binding or MQTT # Persistence bundles. Replace <broker> with an ID you choose . # # URL to the MQTT broker, e.g. tcp://localhost: 1883 or ssl://localhost: 8883 mosquitto.url=tcp://localhost: 1883 # Optional. Client id ( max 23 chars) to use w

Install Node-RED on Orange Pi

Image
Step 1: Install NodeJs v7.x curl -sL http s: // deb .nodesource. com /setup_7. x | sudo -E bash - sudo apt- get install - y nodejs Step 2: Install Node-RED sudo npm install -g --unsafe-perm node-red Step 3: Start Node-RED root@orangepizero:~# node-red 22 Mar 17 : 51 : 35 - [ info ] Welcome to Node-RED =================== 22 Mar 17 : 51 : 35 - [ info ] Node-RED version: v0.16.2 22 Mar 17 : 51 : 35 - [ info ] Node.js version: v7.7.3 22 Mar 17 : 51 : 35 - [ info ] Linux 3.4 .113-sun8i arm LE 22 Mar 17 : 51 : 37 - [ info ] Loading palette nodes 22 Mar 17 : 51 : 43 - [warn] ------------------------------------------------------ 22 Mar 17 : 51 : 43 - [warn] [rpi-gpio] Info : Ignoring Raspberry Pi specific node 22 Mar 17 : 51 : 43 - [warn] ------------------------------------------------------ 22 Mar 17 : 51 : 43 - [ info ] Settings file : /root/.node-red/settings.js 22 Mar 17 : 51 : 43 - [ info ] User directory : /root/.node-red 22 Mar 17 : 51 : 43 - [